About
Here is everything you need to know about configuring your resource with respackopts. Respackopts is available on Modrinth and CurseForge
Compatibility
- Fabulous/Canvas/Frex Shaders
- Resource Packs
- DataPacks
Packs using Respackopts
This list doesn't include all packs using respackopts, just some I know of. If you want your pack added/removed from here, you can open a PR
- Lumi PBR Ext (also Lumi Lights at some point)
- GUI Retextures
- Foliage+
- Dark Containers
- Dirt path texture fix (planetminecraft)
- Chimney Pots
- Amethyst's internal pack
- Dark Transparent GUI
- Better Chests
- Fresh Chests
- DefaultEx
- Shaped Like EGG
- Some NFG modpack/client project
- Caliburn Leaves
Creating a Screen
Before we begin
Any pack id or config entry name MUST only contain alphabetical characters (no numbers, spaces, underscores, etc) and SHOULD be in camelCase. If that is not the case, you may face unexpected issues. You can add translations to work around this in the UI shown to users though.
Creating a config
In order to start using Respackopts, you must first add a config file to your pack.
To do so, add a customized version of the following to your pack as /respackopts.json5:
{
    id: "<PackID>",
    version: 9,
    capabilities: ["FileFilter", "DirFilter"],
    conf: {
        // Your config options here
    }
}
Capabilities:
FileFilter: (Default Enabled)
If stated will enable file filtering functionality.
DirFilter: (Default Disabled)
If stated will enable folder filtering functionality.
DirFilterAdditive: (Default Disabled)
If stated this will enable a compatibility fix for some mods that also modify resources.
Adding a Toggle/Boolean
To add a boolean entry, add code like this: "entryName": <Default Option (true/false)>
Example:
{
    id: "examplePack",
    version: 9,
    capabilities: ["FileFilter", "DirFilter"],
    conf: {
        someTexture: true,
        someOtherTexture: false
    }
}
Result:

See ToggleFiles to see the logic behind this
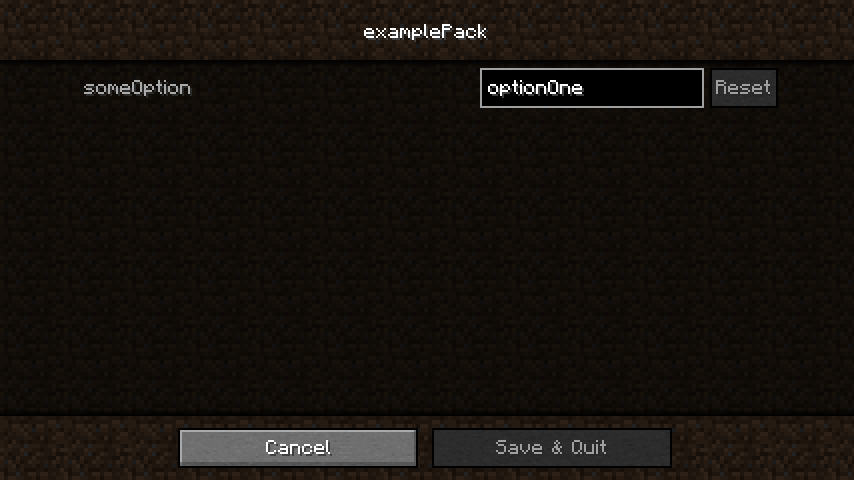
Adding a Free Number Box
A number box follows the same principle as a boolean: "entryName": Default Number
please note any value can be put in here with no limit
Example:
{
    id: "examplePack",
    version: 9,
    capabilities: ["FileFilter", "DirFilter"],
    conf: {
        someOption: 10
    }
}
Result:

Adding a slider
A slider is slightly more complicated as a minimum and a maximum need to be defined. More information is available here
Select From a list
To allow users to select one entry from a list, you can use a json array with string entries. Numbers/etc are not supported
Example:
{
    id: "examplePack",
    version: 9,
    capabilities: ["FileFilter", "DirFilter"],
    conf: {
        someOption: [
            "optionOne",
            "optionTwo",
            "optionThree"
        ]
    }
}
Result:
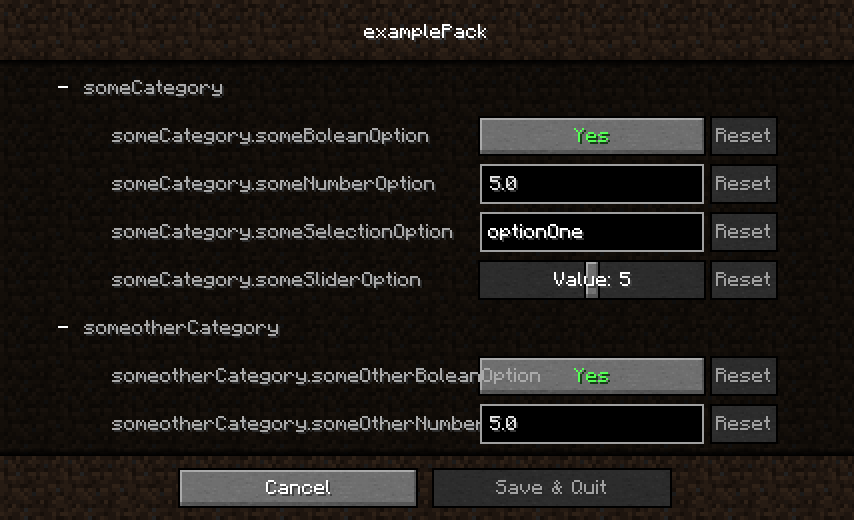
Make a category
Example:
{
    id: "examplePack",
    version: 9,
    capabilities: ["FileFilter", "DirFilter"],
    conf: {
        someCategory: {
            someBoleanOption: true,
            someNumberOption: 5,
            someSelectionOption: [
                optionOne,
                optionTwo,
                optionThree
           ],
            someSliderOption: {
                min: 0,
                default: 5,
                max: 10
            }
        },
        someotherCategory: {
            someOtherBoleanOption: true,
            someOtherNumberOption: 5
        }
    }
}
Result:
Advanced config entries
Common info
Every advanced entry will be represented as a json object. Every entry can contain the following properties, regardless of its type:
| Name | Required | Description |
|---|---|---|
| type | yes | The type of the entries. Each one can contain specific info, more on that below |
| default | yes | The default value for this entry. This is what you would specify in a normal config entry (except for enums, where this is just the default entries name) |
| reloadType | no | "Resource" or "Simple", specifies whether resources have to be reloaded if this is changed. Frex shaders will be reloaded anyways |
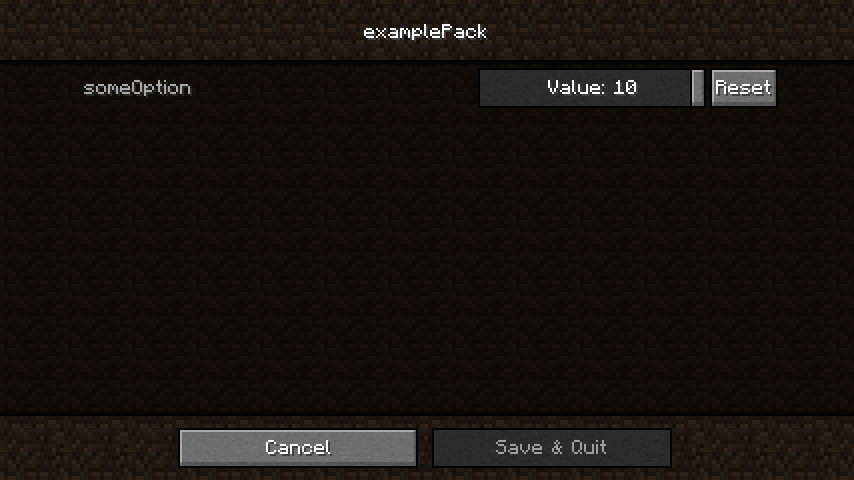
Numbers
There are two ways to display numbers: input boxes and sliders.
Any number input that provides a minimum and maximum value will be displayed as a slider instead of a box.
Their type is number for fractions and integer for whole numbers.
Example:
{
  id: "examplePack",
  version: 9,
  capabilities: [
    "FileFilter",
    "DirFilter"
  ],
  conf: {
    someOption: {
      type: "number",
      default: 5,
      min: 0,
      max: 10
    }
  }
}
Result:
Booleans/Toggles
These do not expose any additional options, look under Common info. Their type is boolean
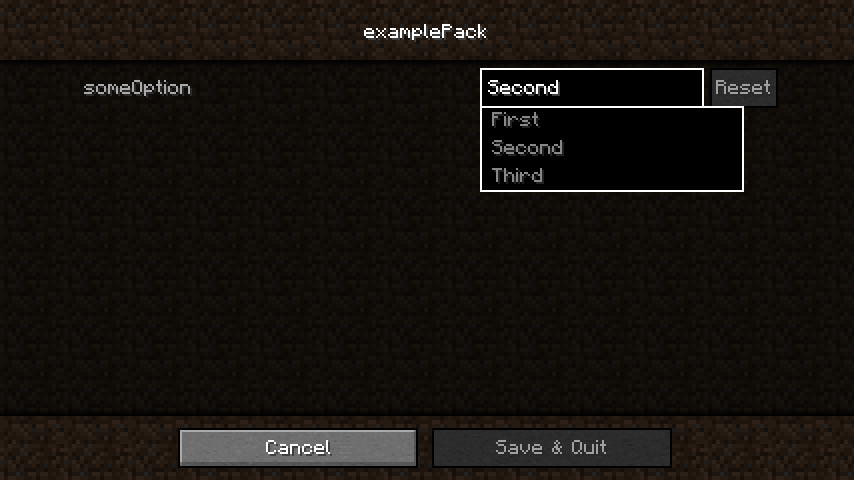
Enum entries/Selecting from a list
The possible values for this entry will be under values, while the default value will just be a string.
Their type is enum
Example:
{
  id: "examplePack",
  version: 9,
  capabilities: ["FileFilter", "DirFilter"],
  conf: {
    someOption: {
      type: "enum",
      default: "Second",
      values: ["First", "Second", "Third"]
    }
  }
}
Result:
Translating your config
Adding a translation file to your pack can not only be used to translate your content, it also enables you to change the way entries are displayed in the config screen without changing your actual config. NOTE: translations added like this will only be shown if the resource pack containing them is loaded.
Creating a lang file
Respackopts relies on minecrafts built-in system for translations. This means that you can add them to the normal assets/minecraft/lang/en_us.json file in which minecrafts on translations reside.
An empty translation file will look like this:
{
    // your entries
}
Changing the config screens title
In order to change the title of the config screen respackopts generates for your pack, you can add an entry as follows:
{
    "rpo.examplePack": "Some other name"
}
This will change the display name of the pack with the id examplePack to the piece of text after it, in this case Some other name.
Changing an entries name
This works similarly to changing the title, however, the name of the entry is appended to the pack id. Example:
{
    "rpo.examplePack": "Some other name",
    "rpo.examplePack.someTexture": "Some Texture"
}
This example would set the text of the entry named someTexture in the pack with the id examplePack. Categories work the same way as they do in .rpo files and everywhere else: you use categoryName.entryName instead of entryName.
Enum entries ("Select From a list") can be translated using rpo.<pack id>.<entry id>.<entry>, for example "rpo.examplePack.someOption.optionOne": "Option One"
Adding a tooltip to an entry
The translation system also enables you to add tooltips (small pieces of text that are shown only if the users' mouse cursor is above the option) to config options. The syntax for these is as follows: rpo.tooltip.<PackID>.<Entry Name>.
Example:
{
    "rpo.examplePack": "Some other name",
    "rpo.examplePack.someTexture": "Some Texture",
    "rpo.examplePack.someTexture.tooltip": "This would be the tooltip"
}
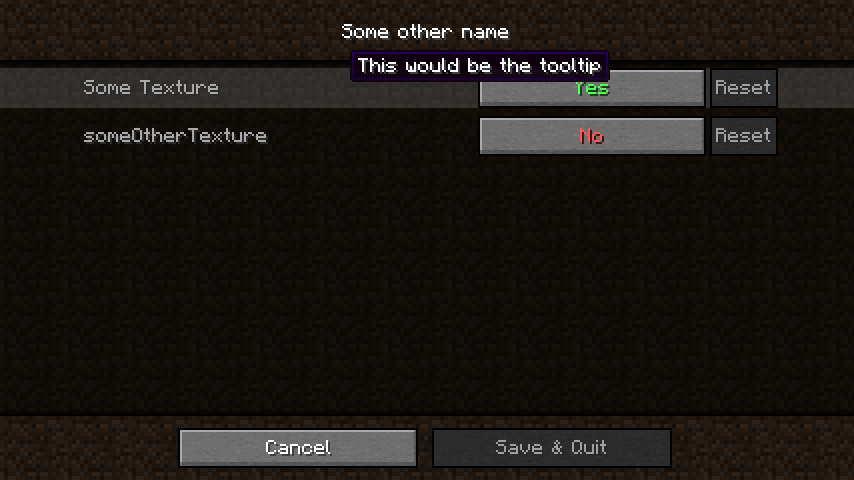
Finished example
Assuming that someTexture is a boolean toggle, with the language file presented above, the config screen will look as follows:
Debugging
If you run into issues with respackopts and cannot find a solution here, please contact me directly for support or help (details are at the bottom of this page)
Enable debug logs
If debug logs are enabled, respackopts will enable additional checks that make finding common issue much easier.
It is not enabled by default for performance reasons, but if you are making a pack or debugging, it is recommended to enable it.
Verify that the option you are using exists
One common issue is that you removed an option but still use it somewhere. The log will usually reference that option and the source. You can use the dumped scope as a reference for what actually exists for your condition.
Ensure you are using the correct dots
Respackopts only supports normal dots. If you write commas or colons by accident, your pack WILL fail to load.
Ensure there are no ID conflicts
If you have multiple packs with the same ID, your conditions might not work as expected. You will see a warning in the log if this is the case.
Run the condition manually
You can use /rpoc execute to run muScript code snippets in-game with all configs applied (be aware that you will need to prefix your entries with your pack id when doing so).
This can help you identify issues with your conditions or see what the result of a condition is.
Dump scope
You can use /rpoc dump scope to output muScript code representing the scope passed to your conditions.
Comparing this with your condition should help you figure out most issues.
If your conditions are not working as expected, this is something you should check.
Dump GLSL code
You can run the command /rpoc dump glsl to dump the shader code generated by respackopts to a file.
I recommend reading through it if your shader is misbehaving. The content imported to your shader by the integrations will equal the dumped code.
Dump the internal representation
Running /rpoc dump config will dump all data available about the enabled packs, including their config options (but not individual configurations like .rpo files)
You can use this if a respackopts.json5 isn't working as expected
Look at the config file
Respackopts stores configurations next to their corresponding resource packs (some pack.zip.rpo usually)
This file contains all applied config options as saved by respackopts.
If you are unsure about the state of your pack, you can look at this file to see what options are applied.
Dump asset
You can dump individual files with /rpoc dump asset <identifier>.
This allows you to see the actual file minecraft will use for a given identifier. This is especially useful when using file expansion.
Avoid infinite loops
Ensure that you do not reference an original file or a previous fallback from a fallback. Respackopts WILL crash if it runs into an infinite loop!
If you get a StackOverflowException, you can enable debugLogs and validationLayer in the config, which might help you figure out what is wrong.
Contact me for support
If you are unable to identify the issue, you can try contacting me. As respackopts is a complex mod, there is a non-zero chance that your issue may be caused by a bug in the mod. Even if the issue is in your code, I can still try helping you fix it.
Toggle Files
A condition can be looked at like an IF statement simply returning true/false to configure whether the texture/file should be loaded into the pack.
(Turns the texture "on" or "off").
You will need the Pack ID and Entry Name from your respackopts.json5 that you created earlier
if you have not, see Main Config on how to do so.
You will need to navigate to the file you would like to toggle inside your resource, and create a .rpo file for it in the same folder(directory).
Examples:
texture.png would be texture.png.rpo
recipe.json would be recipe.json.rpo
Layout:
{
    condition: "<entry name>"
}
Example:
{
    condition: "someTexture"
}
For more information on conditions, read this
Toggle Directories
Directories ("Folders") can also be toggled without toggling individual files.
To do this, create a file in the directory you want to toggle titled .rpo (no file name).
Both conditions and fallbacks work like they do on files, however, specifying multiple fallbacks
for a directory will not work. In some cases, you may need to add "DirFilterAdditive"
to your capabilities inside your respackopts.json5 for fallbacks to work as expected.
Please be aware that you should NOT specify it unless you are SURE you need it, as it will worsen performance.
See Switch between two files to see how to swap textures out with each other (alternate Options)
Switch between two files
Imagine a simple IF statement controlling whether the texture/file should be loaded into the pack.
That is exactly what this page is about.
You will need the Pack ID and Entry Name from your respackopts.json5 that you created earlier
if you have not, see Main Config on how to do so.
You will need to navigate to the file you would like to toggle inside your resource, and create a .rpo file for it in the same directory (folder).
Examples:
texture.png would be texture.png.rpo
SomeRecipe.json would be SomeRecipe.json.rpo
Layout:
{
    condition: "<entry name>",
    fallback: "location/of/the/file"
}
Example:
{
    condition: "someTexture",
    fallback: "assets/minecraft/textures/example/alternate.png"
}
Please be aware that Minecraft restricts file and path names. You MUST follow these! If you don't (for example by using uppercase letters or symbols), your pack WILL NOT WORK!
Another way to do this:
Respackopts supports specifying multiple possible fallbacks when configuring single files. You can use this functionality as follows:
{
    condition: "<entry name>",
    fallbacks: [
      "location/of/the/file",
      "assets/minecraft/textures/example/alternate.png"
    ]
}
{
    condition: "someTexture"
}
See Toggle Files to see how to just disable files.
Select one of multiple files
This Allows you to pick between multiple files (3 or more files) using similar logic to Toggle Files
But this requires multiple .rpo files to achieve the desired goal.
You will need the PackID and EntryName from your respackopts.json5 that you created earlier
if you have not, see Main Config on how to do so.
You will need to navigate to the file you would like to toggle inside your resource, and create a .rpo file for it in the same folder (directory).
Examples:
texture.png would be texture.png.rpo
some_recipe.json would be some_recipe.json.rpo
.rpo explanation :
You need a .rpo file per texture (except for the last one in your list) if you have 3 files to select between then you will need 2 .rpo files,
if you have 4 files to select between then you will need 3 .rpo files and so on etc...
Layout:
This is your first .rpo with your first file:
{
    condition: "<your entry>",
    fallback: "path/to/second.json/.png"
}
This is your second .rpo with your second file:
{
    condition: "<your entry>",
    fallback: "path/to/thirdfile.json/.png"
}
Example:
{
    condition: "option_one",
    fallback: "path/to/secondfile.json"
}
{
    condition: "option_two",
    fallback: "path/to/thirdfile.json"
}
Advanced Conditions
Respackopts uses "conditions" for deciding what files to load.
Respackopts conditions are usually a simple string with the entry name
(for example, someTexture),
however, respackopts provides various additional features to enhance their functionality.
This functionality is powered by the μScript language
This page will provide a quick overview over the available operations.
For more complete documentation, use the above link.
(Boolean) logic
You can use logic operations on several values to only show resources when a combination of them applies
Some common logical operations are supported, others indirectly.
That includes NOT (!), AND (&), OR (|), XOR (==) and XNOR (!=)
Numbers
Numeric values can be accessed by their name, just like boolean values. All typical mathematical operations are supported,
that includes addition (+), subtraction (-), multiplication (*), division (/) and modulo (%)
Accessing values
By default, all values for the current pack will be available by their name or as entries of a category (someCategory.someOption).
In addition, all values of other packs are accessible under their pack id (somePack.someOption).
Respackopts also allows checking mod (or minecraft) versions against predicates as follows:
version('<mod name>', '<predicate>'), for example version('minecraft', '<=1.16.5')
Fabric Resource Conditions Interop
Fabric API provides a system called resource conditions, which is similar to respackopts own system. Respackopts previously allowed accessing fabric resource conditions and respackopts conditions from one another, however, this feature was removed in favor of enforcing the new muscript syntax.
Dates
Respackopts supports expressing conditions on the date of resource loading (not necessarily the date the resource is used)
You can get the current date via date.today and compare it (==, >, <, ...) with a date object created
via the date constructor, for example: date(2022, 5, 4) stands for the fourth of may 2022.
You can also access the year, month or day using .year, .month or .day respectively (for example, date.today.year == 2022)
Times
Respackopts supports expressing conditions on the time of resource loading (not necessarily the time the resource is used)
You can get the current time via time.now and compare it (==, >, <, ...) with a time object created
via the time constructor, for example: date(23, 30, 1) stands for half past 11 PM and one second
You can also access the hour, minute or second using .hour, .minute or .second respectively (for example, time.now.hour >= 21)
Usage in Shader Packs
Getting started
All you need to do to access respackotps values is paste the following in a file where you want them according to your renderer:
| Renderer | Include snippet |
|---|---|
| Canvas | #include respackopts:config_supplier |
| Vanilla/Fabulous | //include respackopts:config_supplier (this is done to avoid problems when loading shaders without respackopts) |
However, usually you will want to still have a pack that works if respackotps is not present. In that case, canvas will still load the file, however, values that respackotps registers will not be available leading to compile errors. To avoid this, I recommend creating a source file in your own shader which will load default values if respackotps isn't present. You can do that as follows:
#include respackopts:config_supplier

#ifndef respackopts_loaded
// define your default values here
// Example:
// #define examplePack_someTexture
#endif
You will then need to include this file in the places you want to access its values.
Using the values
All values respackotps exposes follow the form: <id>_<entry> or <id>_<category>_<entry>
To view the code respackotps generates for your pack, you can run the /rpoc dump glsl command in minecraft (You must enable the debugCommands config option for this).
This will create a frex.frag file in your .minecraft/respackotps directory containing the generated shader code (available since 2.7.0).
Resource Expansion
Sometimes, you may wish to use respackopts values inside your text files (for example as model transforms), without switching between a bunch of similar files. For this purpose, respackopts allows replacing text in files via resource expansion.
You can use the expansions block in your .rpo to replace content with a value computed by executing a custom μScript expression.
Values can be accessed in the script in the same exact way as in condition objects,
as the same language and object representation is used, though the result of a script is a string and not a boolean here.
I should probably point out here that, since the result here is always a string,
string concatenation via the || operator is possible and recommended.
For example, the following is a valid script: 'Text ' || (someNumber * 15) || someBoolean
Example:
respackopts.json5:
{
  id: "examplePack",
  version: 9,
  capabilities: ["FileFilter", "DirFilter"],
  conf: {
    oakFence: {
      uvLock: true,
      invertOrientation: false,
      yFactor: 0
    }
  }
}
oak_fence.json.rpo:
{
  expansions: {
    uvlock: "examplePack.oakFence.uvLock",
    orientation: "!examplePack.oakFence.invertOrientation",
    y000: "examplePack.oakFence.yFactor + 0",
    y090: "examplePack.oakFence.yFactor + 90",
    y180: "examplePack.oakFence.yFactor + 180",
    y270: "examplePack.oakFence.yFactor + 270"
  }
}
oak_fence.json:
{
  "multipart": [
    {
      "apply": {
        "model": "minecraft:block/oak_fence_post"
      }
    },
    {
      "when": {
        "north": "${orientation}"
      },
      "apply": {
        "model": "minecraft:block/oak_fence_side",
        "y": ${y000},
        "uvlock": ${uvlock}
      }
    },
    {
      "when": {
        "east": "${orientation}"
      },
      "apply": {
        "model": "minecraft:block/oak_fence_side",
        "y": ${y090},
        "uvlock": ${uvlock}
      }
    },
    {
      "when": {
        "south": "${orientation}"
      },
      "apply": {
        "model": "minecraft:block/oak_fence_side",
        "y": ${y180},
        "uvlock": ${uvlock}
      }
    },
    {
      "when": {
        "west": "${orientation}"
      },
      "apply": {
        "model": "minecraft:block/oak_fence_side",
        "y": ${y270},
        "uvlock": ${uvlock}
      }
    }
  ]
}
Explanation
The expansions block contains a key ("uvlock") and a script, which is executed when the file is loaded. All instances of the key (formatted as ${name} -> ${lights} in this example) will be replaced by the result of the script. Make sure to only use this feature on text files as unexpected results my occur otherwise
Changes between versions
The version specified in your pack.json refers to a rpo format version.
A new rpo format version will be added whenever a change might break previous packs,
which will continue to use the old version.
This page lists the changes relevant to pack developers between versions and migrations (if needed)
v1
Corresponds to version 1.0 - 1.4.4
- FREX Shader support
- Enum entries (no key translation yet)
respackopts.category.<pack>torespackopts.title.<pack>- Replace dots with underscores in frex definitions
- basic .rpo format
respackopts_loadedin FREX shaders- Slider support (
{"min": value, "default": value, "max": value}) - Tooltips:
respackopts.tooltip.<pack>.<entry> - Boolean conditions (and, or, nor, xor, equals):
{"<type>":[<entry 1>, <entry 2>]}
v2
Corresponds to version 2.0.0 - 2.2.0
- Removed LibCD compat
- Enum: define enum entries as booleans if they are selected, not their numerical value
- Further shader entry name sanitization
v3
Corresponds to version 2.3.0
respackopts.title.<pack>torpo.<pack>respackopts.field.<pack>.<entry>torpo.<pack>.<entry>respackopts.tooltip.<pack>.<entry>torpo.tooltip.<pack>.<entry>
v4
Corresponds to version 2.4.0 - 2.5.0
- Resource expansion support
- Directory .rpo support
- Allow using singular names and allow using a single entry instead of an array (
fallbackstofallback,conditionstocondition,expansionstoexpansion) - Remove requirement for specifying pack id in conditions:
<pack>:some.entrytosome.entry
v5
Corresponds to version 2.6.0 - 2.7.1
- Pack capabilities, no longer includes DirFilter for new packs by default
- Add /rpo command for debugging
v6
Corresponds to version 2.7.2 - 2.9.1
- allow specifying entries as objects with additional properties (
type,default,reloadType) - Fabulous shader support
- additional StarScript properties
- OPEN_ROOT support (allows custom icon.pngs among other things)
v7
Corresponds to version 2.10.0
- Replace StarScript representation of enums
v8
Corresponds to version 3.0.0-3.1.0
- Entirely new condition representation via MuScript
- Entirely new resource expansion using MuScript
- Removal of fabric conditions API interop in favor of enabling cleaner syntax
v9
Corresponds to version 4.0.0-4.3.1
- New config screen backend powered by LibJF (needed to support serverside)
- New translation key syntax
- Removal of manual configuration for sliders vs input boxes
- Support for respackopts configs in the pack root (
/respackopts.json5instead of/assets/respackopts/conf.json)
v10
Corresponds to version 4.4.0
- Stricter enforcement of legal entry names: instead of sanitization, unsupported names are logged and ignored
v11
Corresponds to version 4.5.0-4.5.1
- Directory RPOs in subdirectories are respected. Previously, only the innermost directory RPO would be used
- Multiple replacements when resolving fallbacks for directory RPOs are prevented
v12
Corresponds to version 4.6.0
- Support for whole numbers (not integers!)
v13
Unreleased
- Supports readString and runScript methods in muScript expressions